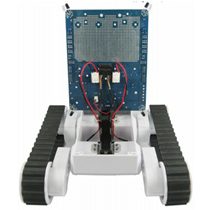
Check out my first post which explains the parts i am using and shows a video of the working prototype.
The first thing i did once all my parts had arrive was try to get the motors moving. I'm going to explain in this post how to do this.
The motor controller i chose is not a gadgeteer module, and in order to drive the motors i needed 2 pwm outputs to control the speed of the left and right motors, and 2 digital outputs to control the direction of each motor. I needed to use a gadgeteer extender module to connect the required pins into a breadboard.
So that i could easily plug it into a breadboard, I soldered a header onto my extender module .
So that i could easily plug it into a breadboard, I soldered a header onto my extender module .
 |
| Back of Extender Module |
 |
| Extender Module with header |
Gadgeteer sockets marked P have pwm capable pins. Pins 7, 8 and 9 are pwm capable.
There are also a few spare pins on the same socket which can be used for digital output. So we only need 1 extender module for the moment.
http://wiki.tinyclr.com/index.php?title=Gadgeteer_SocketsConnect the extender module into one of the p type sockets on the gadgeteer mainboard, and plug the extender module into a suitable position on the breadboard.
Using jumper cables from the breadboard connect the pwm pins from the extender module into the sockets marked PWM on the Motor controller.

The digital outputs from the extender module are connected into the sockets marked DIR.
 |
| Diagram showing left motor controller connections
Make sure all your Grounds are connected. Use the bottom rail of the breadboard as ground, and use jumper cables to connect the ground pin from the extender module and the ground pins on the motor controller to the ground rail.
Once you have everything connected, check it, and check it again to make sure everything is connected correctly and that you haven't done anything silly before you connect the power. The explorer pcb comes with a built in power supply, and is powered by 6 AA batteries which are housed in the Rover 5 base. The battery pack is connected to the under side of the pcb.
When the batteries have been connected there is a switch on the back of the pcb which can be used to switch the power on and off. The Gadgeteer mainboard can also be powered from this power supply.
  I also picked an expansion plate to mount the gadgeteer stuff on Once i had everything wired up. I created a new visual studio Gadgeteer project. Added the gadgeteer mainboard and extender module to the visual designer and wrote the following code to setup the pwm and digital io pins. |
 var leftmotor = extender.SetupPWMOutput(GT.Socket.Pin.Seven);
 var leftMotorDirection = extender.SetupDigitalOutput(GT.Socket.Pin.Five, true);
 var rightmotor = extender .SetupPWMOutput(GT.Socket.Pin.Eight);
 var rightMotorDirection = extender .SetupDigitalOutput(GT.Socket.Pin.Six, true);
I then wrote a simple method to drive the motors by calling the SetPulse method on the pwm pins.
According to the documentation for the motor controller, the high time of the pwm pulse determines the motor power. So 100% high time is 100% power, 50% high time is 50% power and so on.
The period and high time parameters of the SetPulse method have to be provided in nano seconds.
 private void DriveMotor(bool forwards, int speed, GT.Interfaces.PWMOutput pwm, GT.Interfaces.DigitalOutput direction)
 {
   uint pulsePeriod = 20000000;
   var pulseHighTime = speed * 200000;
   direction.Write(forwards);
   pwm.SetPulse(pulsePeriod, (uint)pulseHighTime);
 }
the following code can then be used to drive the motor forwards with 100% speed
DriveMotor(true, 100, leftmotor, leftMotorDirection);
As you can see it's still really simple to drive a motor using a non gadgeteer motor controller.
When i first tested this i wrote a simple program using the Gadgeteer joystick module to drive the motors forwards or backwards depending on which way the joystick was pushed.
Now that i could control the motors, i started working on the object tracking part which i will detail in my next post.
Object Tracking using .Net Gadgeteer
If you enjoyed this post, you can also follow me on twitter or subscribe to this feed.
Just curious...but why did you not use the motor controller on the Explorer PCV?
ReplyDelete